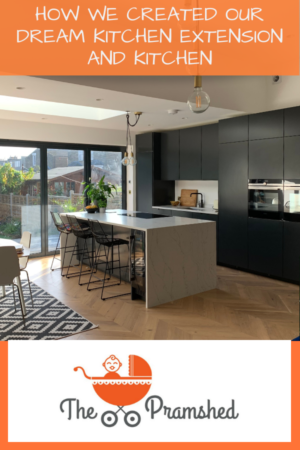
How we created our kitchen extension and kitchen
When we moved into our house in March 2018 we always knew that we were going to do a kitchen extension. The space was crying out for it; it was impractical for us a family with a small kitchen that snaked around the back of the house from the dining room. The current space just didn’t work for us, the kids would always be in a different room to us whilst we were cooking dinner, or vice versa, and we desperately wanted that open plan living space.
After moving in on the coldest day of the year during the beast from the east, we quickly set about getting in touch with builders and making plans. We wanted to get going as quickly as possible with the work, so that we had plenty of time to enjoy living in it. It helped that the sale of our flat and purchase of our house took forever (nearly six months) which meant that we had plenty of time to think about what we wanted.
My goal was to have our house renovations complete a year after we moved in, that didn’t quite happen, however we were in the middle of the build a year later, and I am so glad that we got the plans off the ground quickly. This time last year we were still agreeing costs and a start date with our builder, and it’s amazing to think how much it has changed in 365 days. Little did I realise that during this year I would be thinking about 6 gang switches, skip hire and how we would live here whilst all the work was being completed.
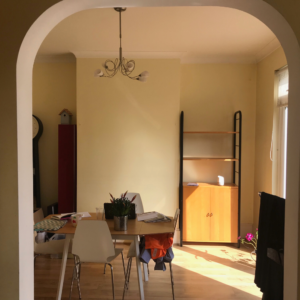
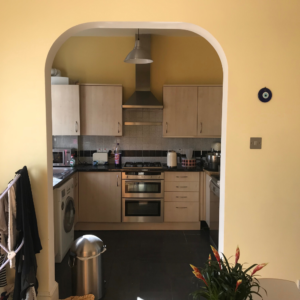
What the old back of the house looked like – the old dining room and kitchen

The planning
Our house is a typical 1920s layout, although it dates back to about 1910 (I think) with the living room at the front, and the kitchen and dining room at the back. We knew that we would punch straight out the back and extend, opening up the existing kitchen and dining room up into one big room.
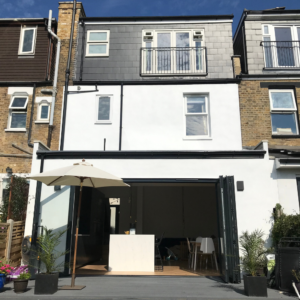
Planning was fairly straight forward and for ease we decided to go down the permitted development route, and had architectural plans and drawings created for this. This meant that we could extend by 3 metres without having to go down the route of full planning permission. To keep in the guidelines of permitted development we opted to keep the exterior of the extension the same as the existing house, which was rendered pebbledash, and then smoothed rendered as part of the renovations.
Part of me wishes now that we had been a little bolder with the design of the exterior with fancy cladding, pushed the designs a little harder, and maybe extended a little further. However there will always be things that you wish you had done during a building project, you live and learn, which is somthing I have learned along the way.
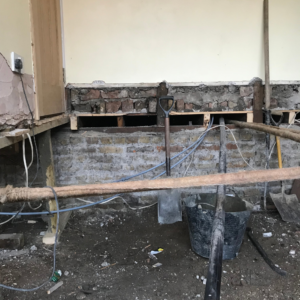
The layout of the interior was one of the biggest factors for me, particularly the floor level. The current house had a drop of 75 centimetres outside the old patio doors and a sloping garden. This meant we were unable to extend at the current floor level otherwise our extension would end up being a couple of metres above the garden level. So we decided to lower the floor at the back of the house, making sure that structurally we could do this and also checking to see whether we had enough void under the existing house to do so, without having to underpin. Luckily we had enough space under the floor level to lower the floor which didn’t require any underpinning, and proceeding down this route was the best way forward for us.
Once we knew we could definitely lower the floor without having a split level extension our next step was to work through with our architect the layout for the internal renovation, extension and where the kitchen would be located in the room. We had a few options and I knew that I wanted a large island. To help keep costs down we opted to keep the kitchen along the wall where it previously existed running into the extension of house. This meant that most of the services could stay in the same place, plus it also works nicely with the flow of the house, allowing us to see the kitchen from the front door through the hallway and out into the garden.
The old kitchen being ripped on the first day of the build, and the new doorway into the kitchen extension being opened up.

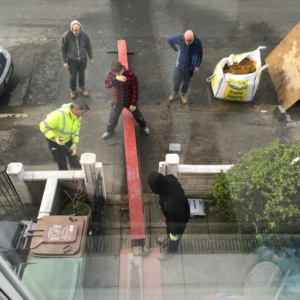
Our team of builders rolling the supporting steal into the house – this is currently holding the back of the house up.
Brutal scenes when the existing kitchen and dining room floor was removed.
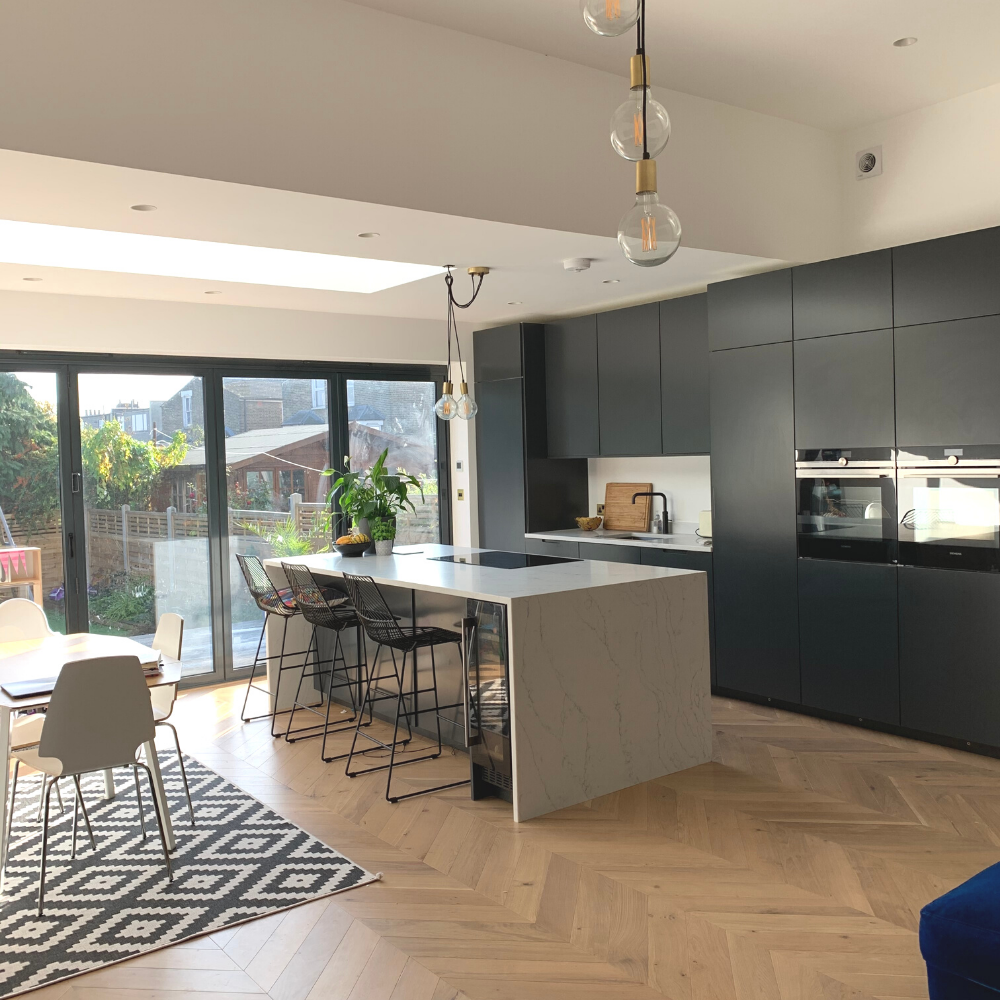
The kitchen
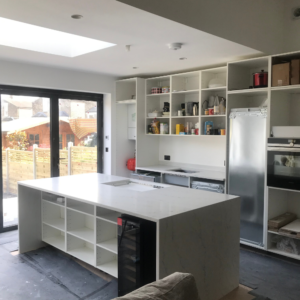
The layout of the kitchen was the fun part. I had the layout in my head pretty much from the outset and we really haven’t deviated a great deal from it at all. As soon as we knew the exact length of the room when the downstairs toilet had been built we then knew exactly how many units we could get in, which was a run of 8 x 60cm wide units. I’ll write up a seperate blog post up on the kitchen and island layout, as this post is getting quite lengthy.
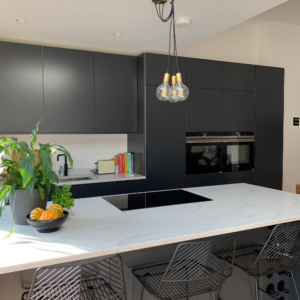
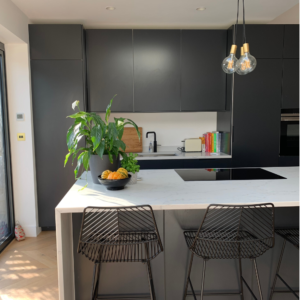
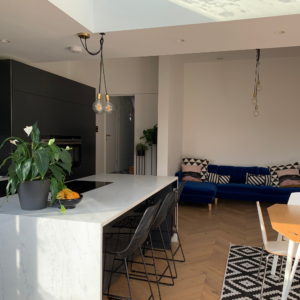
One of the things that I was determined to get right was the size of the island, which was something I mulled over for a long time. The problem with starting from scratch when you have a shell of a room, is that it’s really difficult to work out if something is too big or too small, as you have no context because there’s nothing existing in the room to compare it to. It’s actually a nice problem to have. As we were spanking so much money on the extension, for me going big was key, and we have gone as big as we could with the island. I get a lot of questions about it, and it is 2460mm in length by 1200mm in width. This has given us enough room to accommodate the kitchen on one side of it, and to have a dining table the other side. We have pushed the dimensions to the max, and yes it would be nice to have a slightly wider walkway through the kitchen, a 1000mm wide gap works well – it’s enough room to open the dishwasher and the island drawers together.
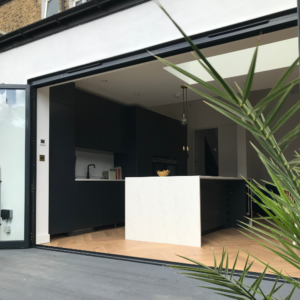
In terms of the style of the kitchen, it was always going to a black contemporary kitchen. We were having a brand new modern extension built on the back of the house, and I wanted the kitchen to reflect that rather than having a traditional style kitchen. To help with our budget, and to focus our money on the important elements of the kitchen such as the floor, worktop and appliances, we opted to base the kitchen on IKEA carcasses and then for our builders joiner to create bespoke door and drawers fronts. Going down this route meant that we were able to design a kitchen that exactly met our requirements, plus it also meant we could buy all of the handyand functional things from IKEA to put into the cupboards and drawers.
Other key things…
There were so many things to think about it when it came to planning the kitchen extension including the flooring, glazing, heating, tiling, lighting all the way through to the mundane things such as light switches. I was adamant that we would have a chevron floor in the extension which was something I wasn’t going to compromise on. It’s expensive, looks great and really adds a depth to the room.
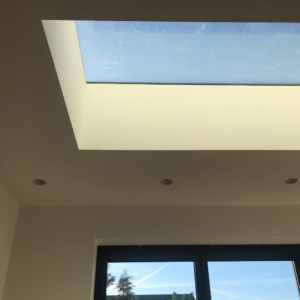
One of the things that I wish I had done a little bit more due diligence on was the bi-folds, they are fine, but I wish that we had a slightly thinner top section. So do your research on these, but on the flip-side I love our skylight, and I love how much light pours into the room from it.
There were also so many things that we needed to think about and answer during the build, and it really helped living and being on-site every day. It was tough with kids, but we did it, and I would do it again. We had a great team of builders who were really conscious of us being there, and if you’re thinking the same I’ve shared my top tips for living through a build with kids in this blog post here, that I wrote when we were in the middle of our house renovations earlier this year.
We are so pleased with what we have created and really enjoy livng in it. We have really created something that we are really proud of, and I can’t wait to get the house dressed up for Christmas.
I could go on and on about our kitchen extension, and I have a list of future blog posts to write on the topic, so watch this space. I hope you’ve found this post useful if you’re thinking about doing something similar.
Claire x
Useful links
Architect and Structural Engineer – https://www.betterlivingspace.com/
Design and Build- https://www.mprmdesignbuild.co.uk/
For the full renovation story and progress follow my Instagram account.


4 Comments
Filip
What you have done with your kitchen looks beautiful Claire. A very well done job indeed. I love the matte black which you chose for the cupboards in the back, and the skylight just looks so beautiful. Inspired!
Christian Alcantara
Your new kitchen looks so good, it gives off this modern vibe and it looks so cozy too, I hope that I could renovate my house like this, kudos to you!
Stone Root
Amazing! The kitchen you designed looks really beautiful indeed. Especially, I Like the idea of adding a skylight which makes it more refreshing.
But many times the new kitchen becomes a bit cost-consuming than expected. I just found a useful article covering ways to cut cost on a new kitchen https://alldivisionbuilding.co.uk/blog/ways-to-cut-cost-on-a-new-kitchen/
Hope it might be useful for others too.
prakash
hi, Its looking awesome kitchen decoration.
Lovely post I would like to share this because its very helpful for me keep it up please don’t stop posting, Thanks for share nice information with us.
Thanks.